Showing posts with label food. Show all posts

Saturday, March 14, 2015

Brownie Cook-off

So I am not sure if this is a real thing or not. But I have decided to try a Brownie Cook-off with myself. I know, crazy right?

My husband loves the bag brownies that he used to get in the store, not the box, they were different. Or so he says.  The kicker is he the Betty Crocker brand in a bag seems to have changed the recipe, and not a fav anymore. Go figure.

I have decided that we have to find a solution to his delima, hence, Brownie Cook-off. Or more specifically Brownie recipe Cook-off.  I went out to Pinterest and found a few "worlds best" brownies, better than a box recipes. Surprisingly there is more than a couple worlds best, how is that possible.

I pulled out 2 of the ones that were similar size pans and cooking time and went to work.

One with butter, one with Vegetable oil, and one with extra chocolate chips which may be my favorite just on the extra chocolate alone.


Both in the oven and now we wait...

The fist one comes out and the verdict is - my husband says too sweet, I am undecided, very chocolates and sweet and would be good with ice cream.  Recipe and link below.


The 2nd one, Oh My Gosh, it too twice as long and the top was a cracker and the the inside was too chewy and almost undercooked.  FAIL!!!

So depressing. Not even going to share the recipes since that would just be mean, but really! I bake and although I will take some responsibility the flavor on the 2nd brownie wasn't good despite the texture.

Neither was successful to my husband, so back to the bag, if he can ever find it. By the way he is on line now trying to see where.  Doh!

Recipe for the sweet brownies found here.


Good luck with your own cook-offs.


Monday, October 22, 2012

Dinner with Friends

Nothing beats ending a long week than having dinner with friends.  We try to get together with our friends, Nikki and Adam pretty regularly.  Sometimes we go out, but lately we have been eating in and taking turns at each others homes.  Nikki and I normally share the meal and trade off on what we bring.  Sometimes though we opt to do it all so the other couple can have a night off.

This last Saturday was just such a night.  Steve and I wanted to treat them to a night off so we planned a very comfort food type meal, with wine and dessert. 

I am always using them as guinea pigs for new recipes and this evening was no different.  I had received an email about Ina Garten's (Barefoot Contessa's) blog and found this recent recipe for a French Apple Tart.  Nikki and I both love to cook and have our strengths, Pies are definitely Nikki's and not mine, although I am still trying.  So when I saw this tart I thought this was right up my alley.

As a side note, Steve still talks about the Apple Pie and Christine (Nikki's daughter) made maybe 5 years ago as the best he has ever had and compares all others to that one.  Apple Pie is one of his most favorite desserts.

Below is the link to the site and recipe but I have also copied in the recipe.  I stayed pretty true to her recipe but I didn't have the Calvados or Rum, and who wants to use water when Alcohol is an option.  I had some Amaretto on hand and used that with the Apricot Glaze.  Gave it a nice almond flavor, subtle but good.  I think I may try this with other toppings as well.  A keeper for sure!!!


Ina Garten's blog: http://barefootcontessa.com/blog.aspx
and her recipe can be found here: http://www.barefootcontessa.com/recipes.aspx?RecipeID=387&S=0

French Apple Tart (Serves 6)

Copyright 2008, Barefoot Contessa Back to Basics by Ina Garten, Clarkson Potter/Publishers, All Rights Reserved

Photo: Quentin Bacon
for the pastry
2 cups all-purpose flour
½ teaspoon kosher salt
1 tablespoon sugar
12 tablespoons (1½ sticks) cold unsalted butter, diced
½ cup ice water

for the apples
4 Granny Smith apples
½ cup sugar
4 tablespoons (½ stick) cold unsalted butter, small-diced
½ cup apricot jelly or warm sieved apricot jam (see note)
2 tablespoons Calvados, rum, or water
For the pastry, place the flour, salt, and sugar in the bowl of a food processor fitted with the steel blade. Pulse for a few seconds to combine. Add the butter and pulse 10 to 12 times, until the butter is in small bits the size of peas. With the motor running, pour the ice water down the feed tube and pulse just until the dough starts to come together. Dump onto a floured board and knead quickly into a ball. Wrap in plastic and refrigerate for at least 1 hour.

Preheat the oven to 400 degrees. Line a sheet pan with parchment paper.

Roll the dough slightly larger than 10 x 14 inches. Using a ruler and a small knife, trim the edges. Place the dough on the prepared sheet pan and refrigerate while you prepare the apples.

Peel the apples and cut them in half through the stem. Remove the stems and cores with a sharp knife and a melon baller. Slice the apples crosswise in ¼-inch-thick slices. Place overlapping slices of apples diagonally down the middle of the tart and continue making diagonal rows on both sides of the first row until the pastry is covered with apple slices. (I tend not to use the apple ends in order to make the arrangement beautiful.) Sprinkle with the full ½ cup sugar and dot with the butter.

Bake for 45 minutes to 1 hour, until the pastry is browned and the edges of the apples start to brown. Rotate the pan once during cooking. If the pastry puffs up in one area, cut a little slit with a knife to let the air out. Don’t worry! The apple juices will burn in the pan but the tart will be fine! When the tart’s done, heat the apricot jelly together with the Calvados and brush the apples and the pastry completely with the jelly mixture. Loosen the tart with a metal spatula so it doesn’t stick to the paper. Allow to cool and serve warm or at room temperature.

Tuesday, October 9, 2012

Baked French Toast

As I was going through the meal I had picked out for that evening and to see what meat I had to take from the freezer I realized I didn't want to make pasta again.  I saw the french bread that was left over from the previous night and the light bulb when off.

Coming up for what to make for dinner can be a chore in itself.  Always trying to make the meals new and interesting for my family it so hard at times. 
I decided to make French Toast.  I remember seeing on a Diner's Drive In and Dives a baked French Toast and thought this would be perfect.


Baked French Toast Recipe

Slice 1" slices of left over French Bread
3 - 4 Eggs, Depends on how much bread.
1c Milk
1t Vanilla
1/4t salt

Plan this the evening before or the at least 4-5 hours before you need to cook it.
In a medium bowl mix eggs, milk, vanilla and salt.   (May need to add more eggs/milk depending on how much bread you have.)  I had 1/2 a loaf, 7 1" slices and this was perfect amount.) 
Lay your bread slices in a container, if possible in a single layer or in a Ziploc bag.  Pour the egg/milk mixture over the bread, turn to coat, cover and refrigerate.  (Key is to make sure that the bread absorbs all the liquid.)

Heat over to 350-375 degrees.  Place the bread slices in an even layer in a greased baking dish.  Bake for 25-30 minutes or until they are lightly browned and the center is slightly firm to the touch.  (May take longer, test 1 to ensure the center is done.)

Meanwhile....  While the French Toast is baking, if you would like to make a sauce to go over the top, now is the time to do it.  I used some fresh strawberries that I had sliced and froze over the summer.  I added them to a sauce pan, added sugar and a little bit of water.  Let that cook down. 

I served with the save and dusted with powdered sugar.  So good. 

A great evening meal for a change.  (For the guys I did also cook some sausage.)  Also, since it is baked a nice coice to have for guests instead of standing over the oven and having some get cold while waiting to cook enough. 

Enjoy!

Monday, September 10, 2012

Tortillas

Last week I mentioned I was going through my Pins and making a few of the recipes.  This is one that I recently pinned that I am pretty happy with.

Homemade Tortillas is one that I pinned while realizing I was having Mexican and forgot to buy flour tortillas.  I also didn't want to make anything with Crisco and came across this easy recipe on Taste of Home.   http://www.tasteofhome.com/Recipes/Homemade-Tortillas#.UEZLQpKOtTw.pinterest

The recipe posted was very simple but I always go over the reviews to see if they have Tips to improve.  I have tried so many recipes to know that many have to be altered in some way or another.   This was no exception.  One of the reviews said to add baking powder and make sure the water is boiling.  I made sure to use those tips and was very happy with the results. 


Homemade Tortillas Recipe

Ingredients

  • 2 cups all-purpose flour
  • 1/2 teaspoon salt
  • 1/2 teaspoon baking powder
  • 3/4 cup water (boil in microwave)
  • 3 tablespoons olive oil


Directions

  • In a large bowl, combine flour, baking powder and salt. Stir in water and oil. Turn onto a floured surface; knead 10-12 times, adding a little flour or water if needed to achieve a smooth dough. Let rest for 10 minutes.
  • Divide dough into eight portions. On a lightly floured surface, roll each portion into a 7-in. circle. [I rolled them between 2 pieces of parchment paper.  This let me roll them very thin and easily peel off and cook.]
  • In a large nonstick skillet coated with cooking spray, cook tortillas over medium heat for 1 minute on each side or until lightly browned. [I cooked them in an iron skillet and didn't use any cooking spray.]  Keep warm. Yield: 8 tortillas.  [I placed the tortillas in a warmer.  After cooking they were a little stiff but after being in the warmer they steamed and became very pliable.]
These came out great and the Steve and Elijah ate them so I think they enjoyed them.  For us, the recipe made plenty, but can easily be doubled.  This one is a keeper.


Friday, September 7, 2012

Pinterest Recipes

This week I decided I was going to use some of my pinned recipes.  I need to start cleaning out my boards as I have accumulated too many and wanted to test a few out.

I made Meatball Bubble Biscuits that are found on this site.  The recipe calls for pre-cooked meatballs which I used, but also did half with cooked Italian Sausage.  (The sausage didn't work as well due to the casings.  I cooked and cut the links into 1" pieces but left the outside on.  Next time will take them off.)
http://kathiecooks.blogspot.com/2010_08_01_archive.html

Here is the recipe from the blog.  I also didn't have string cheese so I used sliced provolone. 
Meatball Bubble BiscuitsSource: Barbie F.

1 can Pillsbury golden layers biscuits - each pulled into 2 layers
10 frozen fully cooked italian style meatballs - thawed and cut in half
2 sticks string cheese - cut each into 10 pieces
1 T. parm cheese
1/2 t. Italian seasoning
1/4 t. garlic powder
1 c. marinara sauce

Heat oven to 375. Separate biscuits into 2 layers. Place 1 meatball half and one piece of cheese into each biscuit, wrap dough around it and seal edges. Place seam side down into 9 inch round cake pan. Sprinkle with parm cheese, garlic pwd. and italian seasoning. Bake 18-20 min or until golden brown. Serve warm with warm sauce.
Here is my pic.  I liked them, Steve not so much.  Said the biscuit made it a little sweet and tasted like a meatball wrapped in a biscuit.  I am going to keep this one as it would be a nice one for a party.  You can make them ahead and freeze them, cook them off when needed.   So for the next little while, I will keep this one.  

Friday, May 4, 2012

German or Swedish Pancakes

Last weekend I came across this pin from a new blog that I have enjoyed reading through.  Not sure how her pancake cups came out so lovely and didn't shrink down like mine did.  


                                                 Pinned Image

The recipe was just like one Steve got from his mom for Swedish Pancakes, which he has always really enjoyed but we rarely make.  I decided to surprise him Sunday morning with breakfast in bed.  Of course mine didn't look as good as the original pic, but they tasted great.  I opted to make a peach and cinnamon topping vs. the one in the recipe of triple berries since Steve likes that better. 

When these bake, they puff up just like a popover.  Pretty cool to watch. 
Breakfast was a hit!

Heading to a Cinco de Mayo festival tomorrow in town.  Should be some great food.  Next week for Mother's day, and Steve's birthday, (although it is now called, The Day that doesn't get mentioned.) we are going up north to see our moms.  Should hopefully have some good stories to pass along.  

Just in case I don't get back here next week, Happy Mother's Day!!!

Thursday, May 3, 2012

A little of this, a little of that

I have come to realize that this blogging thing is certainly something that will not get done daily, or maybe even weekly.  I figure, when I have something to write about or share, I will.  And hopefully it will be worth the read. 

The last few weeks seems to have gone by in a blur.  We have gone on a few mini drives, mainly to beat the heat.  Did a little baking, which less be real, is all I ever do.  Also finally got my garden in but that one is for another day.  (Everything is just starting to grow, for those that started from seeds, or is too small to generate much conversation.)

May is here, school is winding down for my son, and summer is fast approaching.  Starting to think of what will fill the long warm days ahead. April was longer than normal, but here are a few pics of Ojai, a lovely valley in Ventura County.

 I lived there when I was younger, really only a few years, and yet every time I visit, I am struck by such a feeling of comfort and peace.


 Everything is in bloom, and if you have ever been there, the smell of orange blossoms hang in the air as you drive through and you can't help of breath it all in and smile.


After coming home from Ojai we went to a few fruit stands and a tray of fresh strawberries ended up coming home with us.  How dd that happen.  So of course I had to make Fresh Strawberry Pie.  

A bit of background.  Back in November I went through a pie crust phase.  Trying to find the one that would turn out the best for what Steve likes.  (Elijah isn't much of a pie eater.  Steve, absolutely loves Marie Calendar's.) 

I came across this recipe awhile ago for a very close duplicate to a Marie Callender's Pie Crust. Marie Callender's Pie Crust 

This has butter and shortening as well as a mixture of Cake ad All Purpose Flour.  A few more ingredients than others I have come across, but worth the time.

Don't be afraid of the vinegar if you have never used that in a crust before.  I have a few variations on this and the vinegar tends to be a common theme in German styles as well. 

The key for me is chilling and patience!  Chill the ingredients, chill before rolling, chill after rolling and in the pie pan, chill, chill, chill.  Makes all the difference.  Nothing like flash baking your crust and if slumps down and is not useable.

I then made a simple syrup with corn starch and mixed in my fresh berries and topped with whipped cream.  So yummy!  I had left over crust and made Elijah a min Vanilla Pudding pie and Steve a mini Chocolate Pudding pie too.  I went a little crazy, I am secure enough to admit it.

Coming next, Mini German Pancakes.  Stay tuned... 

Wednesday, April 11, 2012

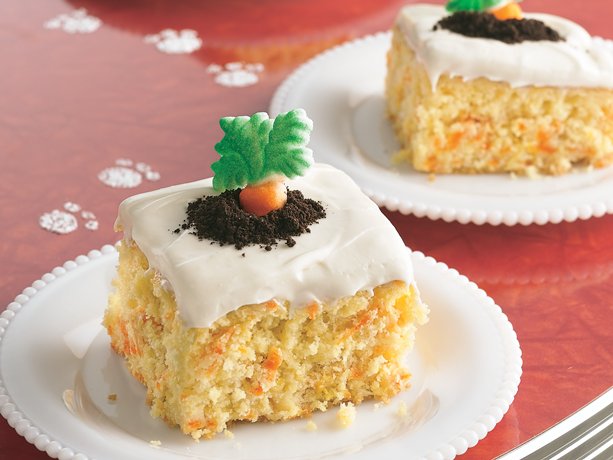
Carrot Pineapple Cupcakes

As mentioned previously these were another item brought to the Easter Potluck.  I wanted to do a Carrot Cake style but not the traditional one.  I love it when I can do a "semi" homemade and use a cake box since I had it on hand.  And let's be honest, they have made those pretty fool proof and why not use a box in a pinch.   I always put a box of pudding in the cake mix, just the powder, and it makes the cakes very moist.

Pineapple-Carrot CakeI pulled this off the Betty Crocker web site the their picture

Cake

1 box Betty Crocker® SuperMoist® butter recipe yellow cake mix
1 box (4-serving size) vanilla instant pudding and pie filling mix
1/3 cup water
1/3 cup butter, softened
1 to 2 teaspoons grated orange peel
1 teaspoon vanilla
4 eggs
1 can (8 oz) crushed pineapple, undrained
1 1/2 cups finely shredded carrots (2 to 3 large)
Frosting 3 cups powdered sugar (I only used 2c since I didn't want it as sweet)
1 package (8 oz) cream cheese, softened
2 tablespoons butter, softened
1 teaspoon vanilla
Toppings:12 chocolate wafer cookies, finely crushed, if desired
15 sugared carrot decorations, if desired
I used bunny marshmellows, tinted coconut, sprinkles and MMs
Decorate to match any occassion.
 
  • 1 Heat oven to 350°F (325°F for dark or nonstick pan). Spray bottom only of 13x9-inch pan with baking spray with flour. In large bowl, beat all cake ingredients except carrots with electric mixer on low speed 30 seconds, then on medium speed 2 minutes. Stir in carrots. Pour into pan.
  • 2 Bake 44 to 50 minutes (46 to 54 minutes for dark or nonstick pan) or until toothpick inserted in center comes out clean. Cool completely, about 1 1/2 hours.
  • 3 In large bowl, beat powdered sugar, cream cheese, 2 tablespoons butter and the vanilla on low speed until blended. Beat on medium speed until smooth and creamy. Spread frosting over cake. With knife tip, score cake into 5 rows by 3 rows (15 squares).
  • Decorate with your favorite toppings.  Refrigerate 30 minutes before serving. Store covered in refrigerator.
Coming soon, pictures of our trip to Descanso Gardens

Tuesday, April 10, 2012

Potluck Pleaser

This weekend for Easter we went to Nikki and Adam's for a potluck.  I always try to come up with something a little different to try since it is a different group of people and there are such varying tastes.   I was challenged with an appetizer, a salad and a dessert. 

The salad is one that I have been making for about 2 years now and although not new, I haven't made it since last summer.  A wonderful pasta salad that is chocked full of flavor and always a crowd pleaser.  I can't take credit for it as I first had a similar version at another event and have Barbara LaRue to thank for introducing me to this flavorful salad.  I do a few variations and since there wasn't a recipe I made it up as I went. 

I have never been a fan of creamy pasta salads and in California you never know how hot it will be so really like that this is an Italian Dressing base. 

Pasta Salad
1 bag Corkscrew pasta (I use Tri-Color)
1 bottle of Italian Dressing, (use whichever is your favorite, although stay away from a Balsamic based one since it will change the color too much.)
1/2 to 1c Mediterranean Feta Cheese
1 container Fresh Mozzarella, depending on size of balls I make them about 1/2" chunks
1/2 c large grated Parmesan cheese
1c Cherry tomatoes, cut in half
1 small can sliced olives, roughly chopped
3 scallions, chopped
1/4c chopped fresh parsley, I prefer Italian Flat Leaf, or I use Cilantro, whatever I have on hand
1/2 to 1c Dried Cranberries
1c Candied Slivered Almonds or Pecans (I will normally make my own, but Trader Joe's has great candied Pecans)

Sounds like a lot but it is well worth it.  Most of this can be purchased ready to drop in, little to no prep work. 

For me the flavor comes from cooking the pasta early, 1 day ahead is best.  Cook the pasta
al dente, this is critical since it will continue to cook while it cools and you don't want mush.  When the pasta is done drain and let cool slightly.  Please in a large resealable bag, (I get the 2 gallon size) and pour 1/2 the bottle of dressing over the pasta. 

As the pasta cools it sucks up the dressing and really flavors the pasta.  Makes a huge difference to do this while the pasta is still very warm.  Mix in the bag turning over and over.  Let cool on the counter and then place in the refrigerator over night or until ready to use.     

Prior to serving and this can be several hours, add the rest of the ingredients with the exception of the nuts. Add more dressing depending on flavor but a little goes a long way. (If the nuts are placed to early in the salad they loose their crunch.)

Just before serving add in the nuts. 

Variations:  The mozzarella doesn't add a whole lot of flavor but is a great texture to the salad.  I sometimes omit the tomatoes or olives and it is just as good, really what I have on hand.  The Cranberries and Nuts are a staple and make the salad in my opinion.  Fresh herbs as well make a huge difference, but experiment and have fun. 

I often double the recipe but only use about 1 1/2 bottles of dressing for 2 bags of pasta.  Use less than you think and have some on the side for those that like more. 

Tomorrow I will post the Carrot Pineapple Cupcakes!

Sunday, March 18, 2012

Lazy Sunday and Weekly Menu

Happy Sunday, and for those living in SoCal it is a clean and fresh after a great day of rain.  Yesterday we stayed inside since the weather was crazy with heavy winds and rain throughout the day. 

So today after being couped up Steve and I went for a short drive out to Ventura and back, stopped at a few fruit stands and enjoyed the scenery.


This is the historic Faulkner House barn.  Love it!  It was closed today but has beautiful gardens and a historic Victorian home on the property. 


This week we are going pretty stream lined with our food.    Last night we got a jump start and Steve made homemade pinto beans, I made Tortilla Soup and Sweet Corn Bread. 
Sunday: Grilled Chicken with a citrus and jalapeno marinade, grilled veggies, penne in cream sauce (a double dish from a few weeks ago, made 2 and froze one) and fresh strawberries/oranges
Monday: Gouda and tomato panini with tortilla soup
Tuesday: Pork burritos with homemade pinto beans and spanish rice
Wednesday: Chicken pesto ravioli, homemade french or soda bread (I haven't decided) and fresh spinach
Thursday: Broccoli Beef and thai noodles

Last week I made the Tempura chicken recipe and again it was a hit.  Definitely adding to my regular list of items.

Have a great week

Monday, March 12, 2012

Gnocchi

So I couldn't wait till next week to post this.  I made the Gnocchi just like they showed in the Food Network magazine.  Great step by step photos that made it easy to follow.  I have to say, after doing it I was surprised it was as easy as they said.  I only had 1 large potato so I reduced the floor some and looked for the smallest egg I could find. 

The results were great!  They really came out as moist pillows of yummy goodness. Steve was surprised that for as much as I love Gnocchi, I haven't tried to make them before now.  Now that I have, me too.  I have tried homemade pasta but that was a little more time consuming and I think I assumed this would be the same.  I was a bit rushed so after 30 minutes in the oven, I finished the potato in the microwave so I would have them ready in time for dinner. 

The Food Network recipe has the sauce as a Brown Butter and herb.  I opted to just do butter, an olive and grape seed oil combo, fresh crushed garlic and parsley.  I added the freshly grated Parmesan and Asiago cheese on top and it was so so  tasty.  Elijah really liked them as well which is always a bonus.   

Picture of Gnocchi With Brown Butter and Sage RecipeHere is the link again for the recipe.

Clearly their picture is much more appealing then mine.  But the flavor of the garlic, oil and butter is well worth it.


Will have to make these for my nephew Keith who loves potatoes and make a larger batch so I can freeze them for future as well.  Also the ricer that they use in the recipe really helped get a good texture of the potato vs. straight mashing.

I really need to figure out how to take better pictures though. 

Looking forward to a great week.  Enjoy it.

Sunday, March 11, 2012

Weekly Menu

Another week has gone by.  This was a little crazy, hence the ZERO updating to the blog.  I did a Beauty Society Party,  check out my web site if you are curious.  www.mybeautysociety.com/gabrielle and on Thursday I accompanied Nikki on a mini road trip for her work to Fresno Ca.   It was a long day, 3 hours each way, but a lot of fun. 

Below are some pictures of what was on last weeks menu. 

This week we are changing it up some and straying from our normal routine.  Doing a few more "sandwich" type meals.

Sunday:  Roasted Chicken Breasts with homemade Gnocchi, (1st try for me so crossing fingers.) and grilled asparagus.
Monday: Croissant Sandwiches with Avocado and Tomato, Yum!
Tuesday: Philly Cheese Steak with grilled garlic potato wedges, see the recipe posted on http://www.food.com/recipe/garlic-potato-wedges-475132  (Just need to post a pic!)
Wednesday: Homemade Pizza
Thursday: Oven fried Chicken with Pasta
Friday: FEND, woo hoo!  Love the day off.


Last week I made Orange Chicken.  Used a recipe I found on Plain Chicken Blog and they came out really good.  Elijah loved them and ate the leftovers that I hadn't mixed into the sauce.  The sauce was a combo of homemade spice, sweet and sour with a little of Trader Joe's General Chicken sauce added in.

Also last week, I originally had homemade french bread set and opted to make these pull apart (Monkey bread style) Garlic rolls that I had pinned from http://life-as-a-lofthouse.blogspot.com/2012/02/mini-garlic-monkey-breads.html instead.  They came out so good, garlic and buttery heaven, definitely a family hit and will make them again soon. 

I am off to try my hat at Gnocchi.  Wish me luck and have a great week.

Sunday, March 4, 2012

Weekly Menu

I have finally come up with what I am going to make this week.  We have changed our shopping time to Friday nights instead of Sunday mornings to open up the weekend and it is wrecking havoc on my brain.  Totally changed the schedule so when we shopped I had no idea what we were going to eat.  Needless to say, we probably bought more "junk" food than we needed and a mishmash of items that I was hoping I could piece together with things from the pantry and freezer.

Today I went through what I had bought and what I had on hand and came up with this weeks menu.  (It helped that 2 of the nights were "Guys Nights" since I will be gone.)

Awhile back I pinned on how we "organize" our weekly meals so we maintain specific themes each night and change up the meal.  This makes is a little easier to create the menu instead of starting from scratch each week.  Also helps with the teenage son who, even though the menu is on the fridge, he still asks "Whats for dinner?" But at least he has an idea of what may be coming.

This weeks menu:
Sunday: Homemade Orange Chicken with steamed rice, pot stickers and broccoli  (I found a recipe from the Plain Chicken blog for Tempura Chicken which I think will work well with this.
Monday (Soup/Salad and Sandwich Night): BLT Sandwiches and Albondigas (Meatball) Soup
Tuesday (Mexican):  Sausage Ravioli w/red sauce, grilled asparagus and homemade french bread (Normally it is mexican night but Saturday Steve made Chicken Enchiladas so we are changing it up.

Wed and Thur is Guy's Night, WooHoo!!!

Today was also spent sitting outside and enjoying the Southern California weather, which I am doing right now. 

I made a few items I had previously pinned on Pinterest and will post those tomorrow.

Monday, February 6, 2012

Kahlua Chocolate Mouse Pie

The name doesn't do this justice.  My girlfriend Nikki and I came up with this desert after we had a very rich chocolate pie a few weeks ago.  The original version was so sweet and rich that we came up with a way to lighten it up, and by lighten I don't want to imply that we reduced any of the fat, calories or flavor.  The lightened version was by adding whipped cream.

The picture is but a slice of the finished product.  We were in such a hurry to have some I completely forgot to take pictures.   The recipe calls for Kahlua but can be omitted if you don't feel comfortable serving to children.  There is only 1 tablespoon so not a whole lot but does add flavor.  The layer of ganache was what the whole pie was previously made with and was very thick.  As the picture shows, we have a 3 layer pie with each having a unique flavor and really came together.  Yum.  Will definetly do this one again. 

Must be a Chocolate Lover to truely enjoy!


Recipe:  (I made this up as I went along so some of these are guesstimates.)
1 Baked 9" pie shell. 

1 bag 10oz Semi Sweet Chocolate morsels, 1/4c reserved
2T brewed Coffee, strong or espresso
4c heavy Cream, separated
1t vanilla
3/4c sugar
1T Kahlua
Grated chocolate for garnish (optional)

Cook the pie crust till lightly golden brown according to a pre-baked shell directions, pricking the bottom and sides of the shell before baking.  We used a Pillsbury Pie Crust.  When removed from the oven add the 1/4c chocolate morsels and allow to melt.  Once melted use a pastry brush and brush a thin layer in the bottom and sides of the cooled crust. 
(This will ensure that the crust doesn't absorb the mouse and get soggy.) 

In a double boiler under medium-low heat melt chocolate morsels with the coffee and 1 1/2c of the heavy cream to create a ganache.  Stir to melt the chocolate.  Once melted pour 3/4c of the ganache into the bottom of the prepared pie crust.  Place pie in refridgerator to chill.

In the meantime while the chocolate is melting, using a blender whip 1 1/2 c of the heavy cream with 1t vanilla and 1/2c sugar, blend until thick.  This works quicker if the bowl and beaters have been chilled.  
Set in refridgerator until chocolate is melted.

Once chocolate ganache is made and the amount for the pie is removed, remove the bowl from the double boiler and allow to cool slightly on the counter, do not place in refridgertor.  Once cooled, fold in the whipped cream to make a chocolate mouse.  Spread into the chilled pie to just below the top of the crust.  There may be some left over.  Great pudding for the next day! 
Return to the refridgerator.

While chilling, whip the rest of the heavy cream, 1c with 1/2c sugar and Kahlua until thick.  Spread over the chilled mouse and return to the refridgerator until ready to serve.

Just before serving grate chocolate over the top of the pie. 


Friday, January 27, 2012

Chicken and Spinach Casserole

I can't believe it is Friday again and that it has been 4 days since I wrote last.  This week has flown by.  I have been looking at ways to save whether that is making gifts, cooking at home more or just realizing I really don't need those pair of jeans. 

The cooking part has been fun.  Working on ways to change up dishes to make them more interesting or creating others to take the desire of out of eating out so much.  The only time that is a little more difficult is keeping the flavors in line with what my family likes.   Friday in my house is fend night, so I am going to try a new casserole that I pinned recently. 

  This is a Chicken and Spinach Casserole from marthstewart.com  I am going to give this one a try.  I may substitute homemade chicken broth for the Wine.

Ingredients

  • 2 cups torn bread (I keep left over bread cubed in the freezer for quick to make croutons)
  • 2 tablespoons extra-virgin olive oil
  • coarse salt and ground pepper
  • 4 cups packed flat-leaf spinach, washed
  • 1 medium yellow onion, finely chopped
  • 1 garlic clove, minced (I used 2)
  • 1/4 cup white wine
  • 2 tablespoons all-purpose flour
  • 1 1/2 cups half-and-half
  • 1/2 teaspoon fresh lemon juice
  • 1 cup shredded rotisserie chicken

Directions

  1. Preheat oven to 450 degrees. In a medium bowl, combine bread with 1 tablespoon oil; season with salt. Set aside, [I separated out 3/4c in a small bowl]. In a medium pot, heat 1 1/2 teaspoons oil over medium-high. Add spinach; season with salt [I only had frozen, so I used about 1c frozen and cooked it just a little while to thaw and then drained]. Cook, stirring, until wilted, 2 minutes. Transfer to a colander, let cool, then squeeze out water. Coarsely chop. [Mine was already chopped]
  2. Wipe pot clean and heat 1 1/2 teaspoons oil over medium. Add onion, garlic; season with salt and pepper. Cook, stirring occasionally, until onion is soft, about 8 minutes.
  3. Add wine to pot [I used homemade chicken stock] and cook until almost evaporated, about 5 minutes. Add flour and cook, stirring, 30 seconds. Gradually whisk in half-and-half. Add lemon juice and bring mixture to a boil over high. [I only had whipped cream so I used 1c cream and 1/2c chicken broth]. 
  4. Remove from heat and stir in [another add in, I added 1/4c Parmesan and asiago cheese blend], chopped spinach and chicken; season with salt and pepper. [I mixed this into the cubed bread]. Transfer to a 2-quart baking dish and top with [the reserved 3/4c] bread pieces. Bake until bread is golden brown and mixture is bubbling, 8 to 10 minutes.
I modified the recipe some from the original version, all the italicized sections are what I changed.  I am notorious for doing that but I know what I like and half the time recipes don't make sense to me.  This one without the cheese seemed a little bland when I read it.  The cheese added just enough flavor.

If you have ever made Chicken Florentine, this is just like it but a great make ahead meal and less messy to prepare.  For the chicken, I had an uncooked breast so I roasted that in the oven, just 1, with salt, pepper and a little olive oil.  The chicken, spinach cream mixture can be made in advance and just before baking add in the bread and pop in the oven.  Perfect for a weeknight meal especially if you had grilled chicken previously, just sent 1 breast aside or for guests.  Tastes like you spent a lot of time on it.

This really came out good.  The bread on top was nice and crunchy with the bread in to the dish like a bread pudding consistency.   My mother and sister-n-laws would love this dish.

  
Hope you try this dish and enjoy it as much as Steve and I did.

On to planning my weekend.   I have a girlfriends birthday coming up so I think I am going to try my hand a making her homemade soaps.  Another of my "80" projects where I have all the ingredients, some thanks to Nikki, but never got up to finishing. 


Monday, January 23, 2012

I love the rain and today the weather was perfect.  Don't get me wrong, I like the sun more, but a good rainy day like today was lovely.  Tomorrow is going to be sunny and after a steady rain makes everything look clearer, cleaner and smell lovely.

Nothing better on a rainy day that cooking comfort food.  I have to being by saying that the meal was already planned prior to the rain, but I think it came out better because of it.  I am going to digress a bit and lay the groundwork.  Every week, I do a menu which is pretty consistent from a general category stand point;
Sunday is usually the "big" family meal where I will go the extra mile and put more work into the meal; Monday: Sandwich night, or soup and sandwiches and in the summer salad and sandwich;
Tuesday: Mexican, "taco Tuesday" is how that came about;
Wednesday: Italian, not sure why, but it is usually some kind of pasta;
Thursday: American and lately another "Monday" night meal; and this is followed up by
Friday is Fend!! all the leftovers, normally my son has plans, or my husband and I meet out friends for a date night.  Saturday is normally this as well.

So with that said, this past week I moved the Sunday meal to Saturday night since we were having friends over for a football day and today was Sandwich night.  In preparation for that, and here is where I left off before, I decided to make Grilled Chicken and Avocado on a Ciabatta roll.  I found this great recipe and everyone was raving about. 

I normally made my bread from an Artisan style recipe that is a large batch of dough made up in advance and then I can pull from it and bake throughout the week.  Great stand by for anything from pizza to a crusty loaf. 

This time I was going for a very specific style of bread and found it at food.com.  (my new go to for consistently good recipes and variety.)


This starts with a "sponge" which is sort of like a sourdough starter but only has to be made 12 hours to 1 day in advance.  I made it last night, and it turned into a very bubbly looking yeasty soft dough.   Today I made the full dough which was very easy and it baked up beautifully.  The recipe makes 2 loaves, one I did just like the recipe calls for and the other I brushed lightly with olive oil and covered in Asiago cheese.


I also made as a last minute add in, the Cheesy Potato Rounds which are basically potato wedges but so much quicker and easier.  They came out so good.


All  in all a pretty good Monday, even if I did have to work all day, but the cooking and baking totally made up for it and I got to enjoy a rainy day.